English | Japanese

ShutterMemory Pro
Plugin for Photoshop | Current Version 1.0.2
ShutterMemory Pro
Plugin for Photoshop | Current Version 1.0.2
(ADOBE Creative Cloud Market Place)
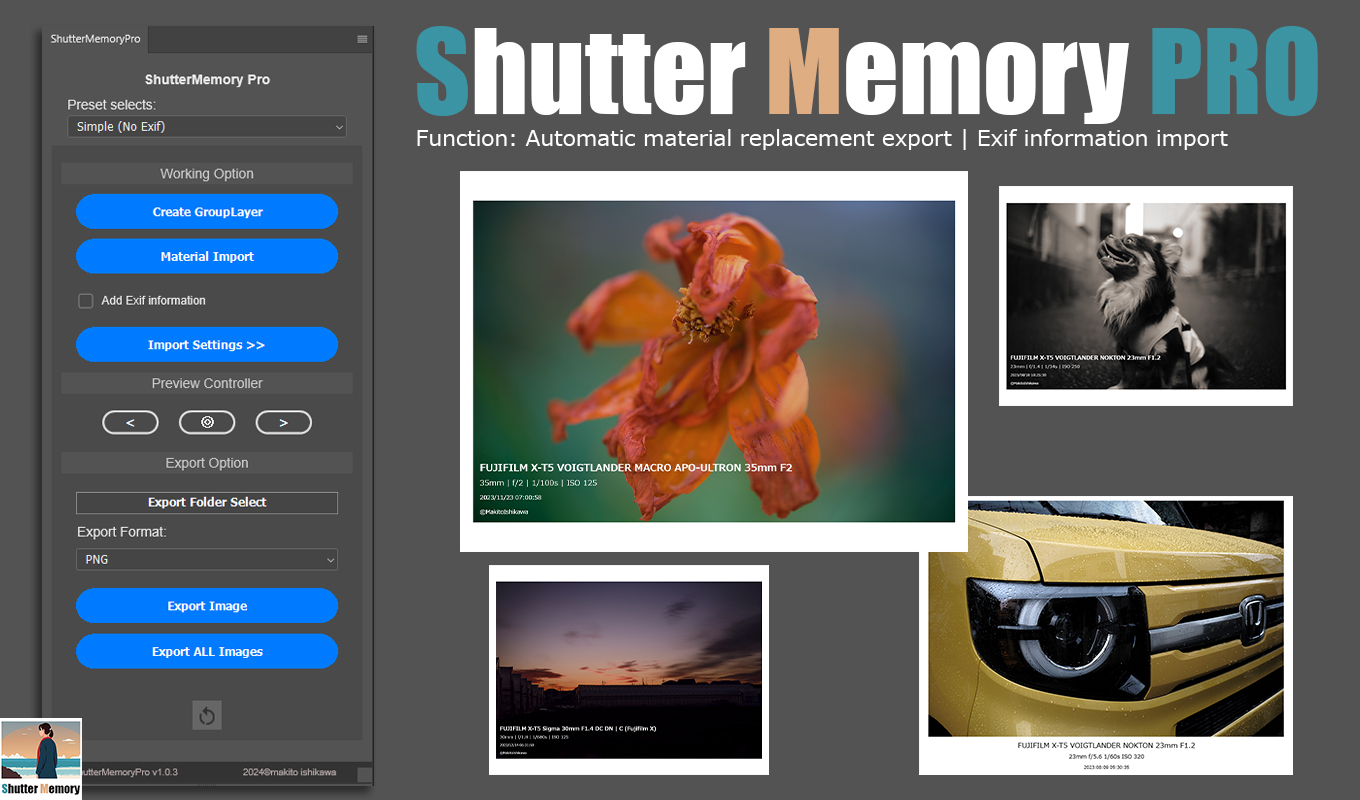
This plugin is useful when you want to create a frame on the photo you have taken. When you want to add frames or watermarks to many images at the same time
You can help import and export when you want to create a common design for multiple images. You can also create frames with Exif information added, which is popular among photographers these days. You can get the Exif information of the imported image via the plugin and add it as a text layer.
- Want to export many images at once in PhotoShop?
- Want to add Exif information?
- Want to add a watermark or logo to all your images?
▷notice
v1.0.2(Released on April 1, 2024)
・Added 1:1 aspect ratio
・Increased number of tags that can be added with Exif tags
・The number of text layers that can add Exif information has been increased from 3 to 4.
・It is now possible to change the space between tags to some symbols.
・You can now select the display format of the date.
v1.0.3(Scheduled to be released in early April 2024)
・Addition of preset export and import functions
・ Export folder set function (by setting it, you no longer need to select it every time. It will be reset when you restart the plugin.)
How to use①
(Only Simple Frame Generate,No Exif)
Step 1
Launching a PhotoShop document
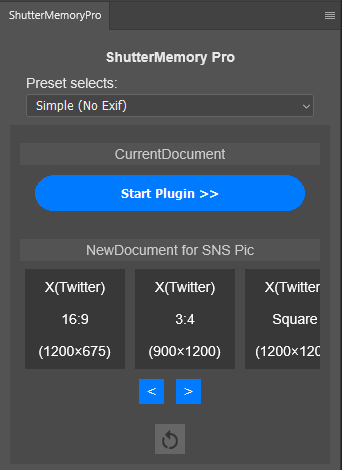
・Use PhotoShop’s standard functions to launch a new document with free settings.
・Start Shutter Memory Pro and launch a new document.
・Open a previously created document.
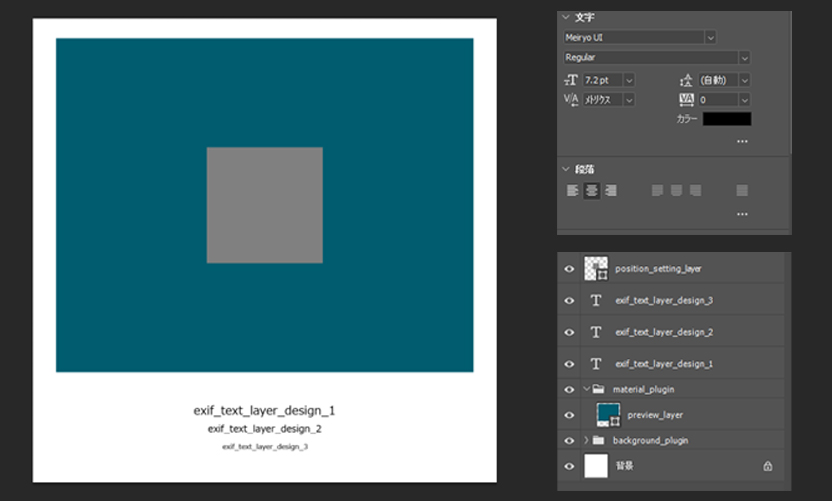
・When you press “Start Plugin” (or start a new document from the plugin), the two group layers “material_plugin” and “background_plugin” necessary for this plugin to function will be automatically generated.
*This plug-in may automatically create group layers, shape layers, and text layers. Each automatically generated layer has its own role, so please be aware that if you do anything irregular to them, the plugin may not work properly.
Step 2
Import image settings
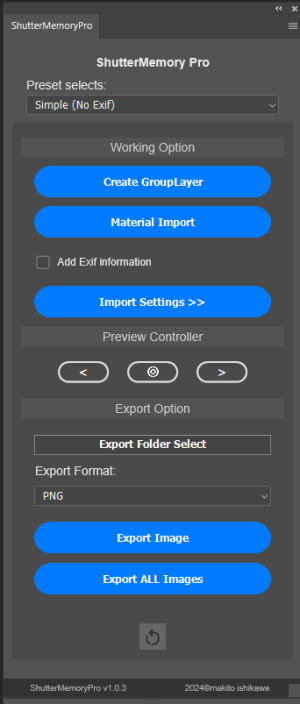
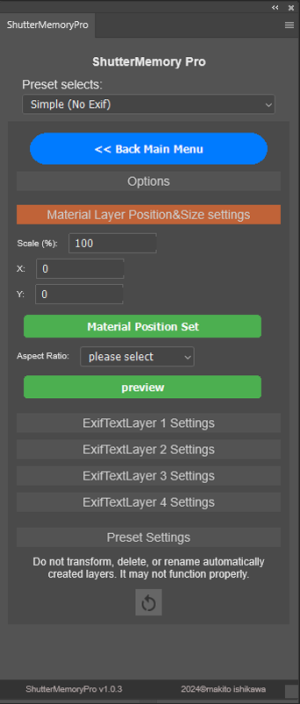
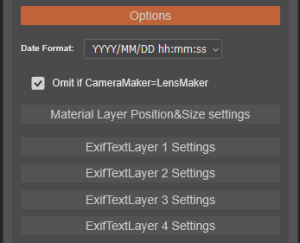
・Click “Import Settings” to open the settings menu.
・Set “Scale (%)”, “X (distance from center)” and “Y (distance from center)” in “Material Layer Position & Size settings” item.
・If you move “position_setting_layer”, which is automatically generated at the top of the layer, to a free position and click “Material Position Set”, the center of the shape will be automatically set to x, y.
・Please change the value of “Scale(%)” manually. (Between 10% and 200%. Never change the size of “position_setting_layer”.)
・There is a preview function to visualize the size of the imported image. Select the aspect ratio of the image to be imported from “Aspect Ratio” and click “Preview” to create a “preview_layer” with the settings reflected in the “material_plugin” group layer.
・If you move “position_setting_layer” to reset the value or manually change the value while previewing, the preview layer will also be changed automatically.
・Once the settings are complete, exit the settings from “back Main Menu”.
Step 3
Create a frame design

・Create a common design in the “background_plugin” group layer.
・Please place the design you want to display above the imported image above the “material_plugin” group layer.
・If Exif information is not added, “exif_text_layer_design_1”, “exif_text_layer_design_2″,”exif_text_layer_design_3”, and “exif_text_layer_design_4” are not used. There is no problem in deleting it. You can automatically generate it again by checking “Add Exif information”.
Step 4
Import & Export Images
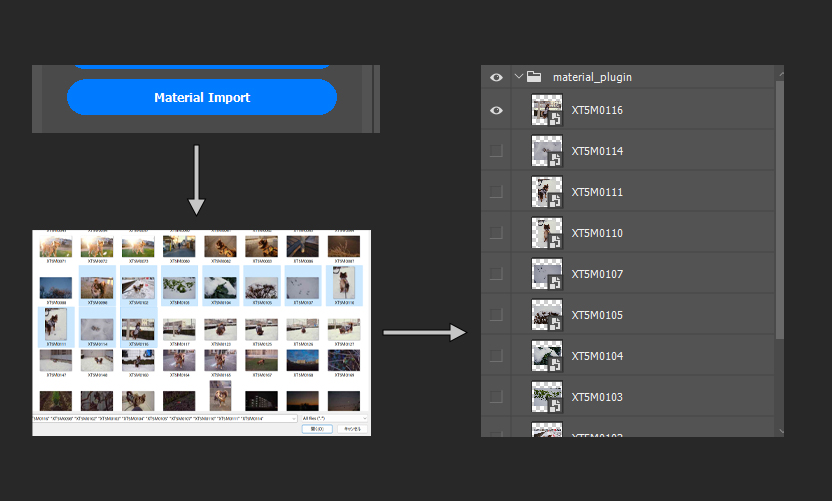
・Click “Material Import” and select the image you want to add. (Multiple selections possible)
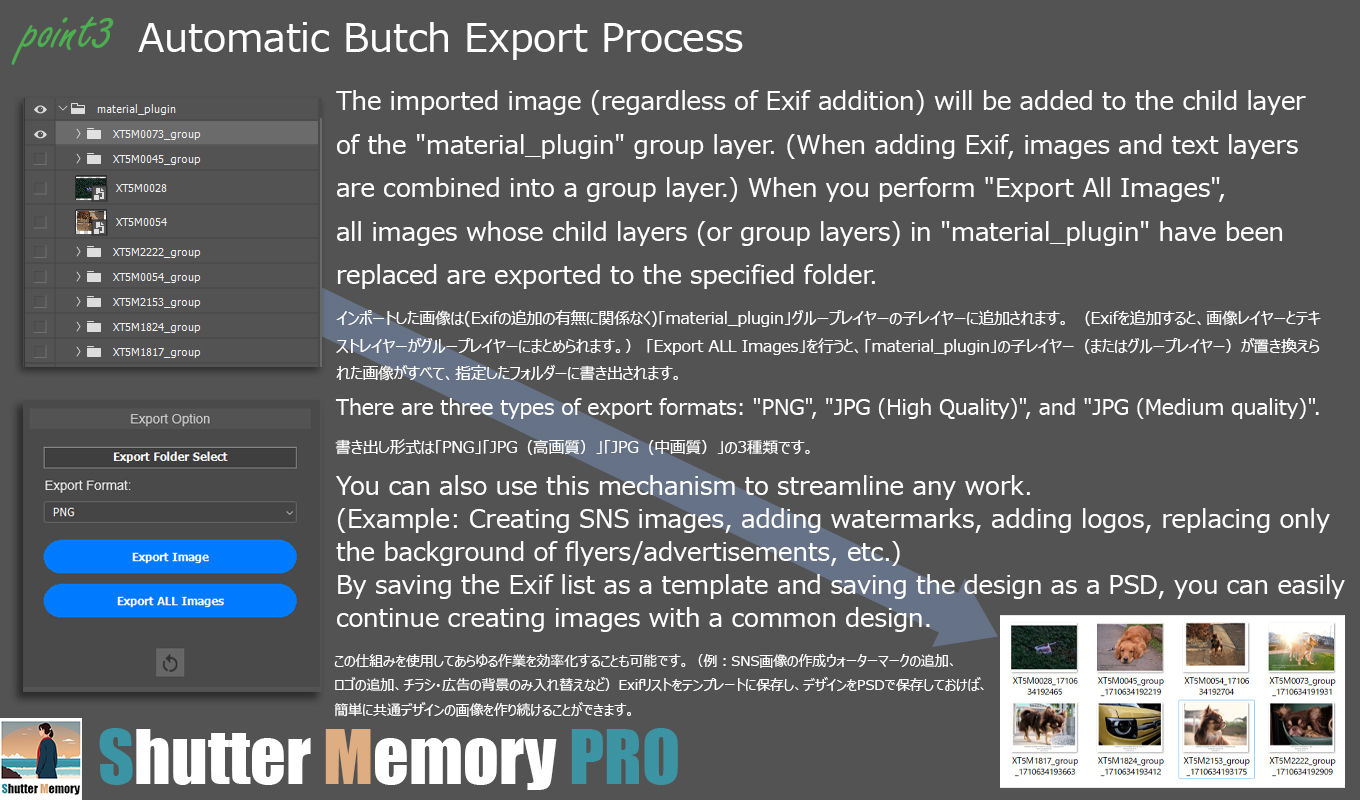
・The selected image will be automatically added as a child layer of “material_plugin”.
・If you want to add individual designs, you can create a group layer as a child layer of “material_plugin” and design within that group layer.
・You can display the child layers of “material_plugin” one by one using the <,◎,> buttons of “Preview Controller”.
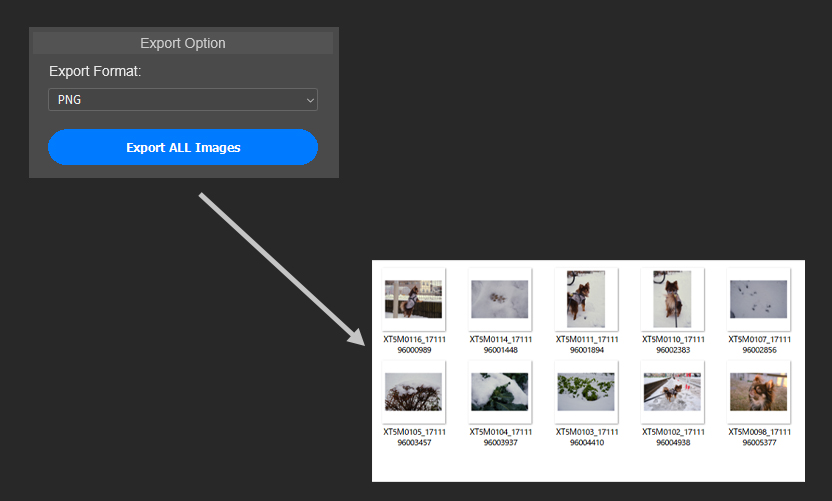
・Once the final design is complete, select the format, click “Export All Images” and select the export folder, and all images will be automatically exported.
*There are three types of export formats: “png”, “jpg (Medium Quality)”, and “jpg (High Quality)”.
How to use②
(Creating a frame using Exif information)
Perform the following settings at the same time as Step 2 of “How to Use ①”.
Step 1
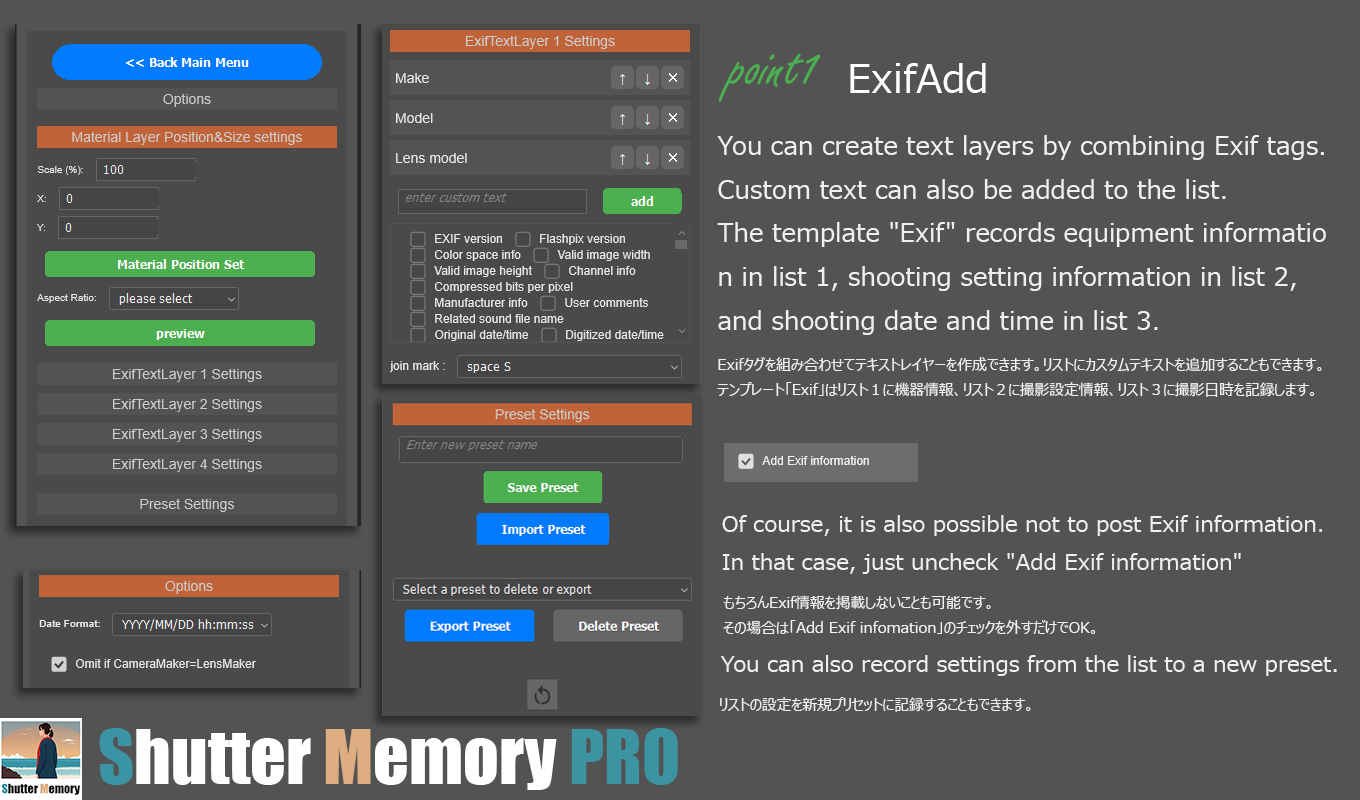
Selecting and ordering Exif tags to add to ExifTextLayer
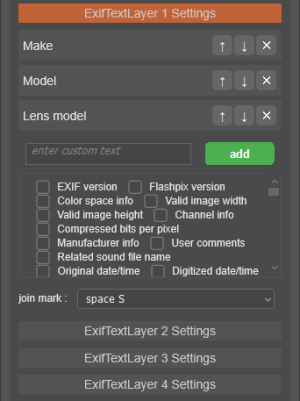
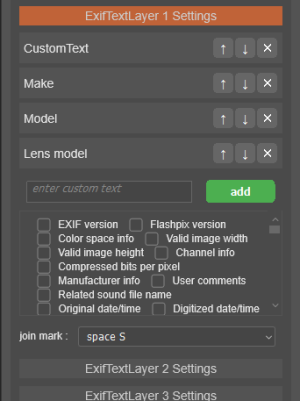
・Check “Add Exif information”. If the design text layer “exif_text_layer1,2,3” does not exist, it will be created.
・You can create three text layers with Exif information added.
・Open “Import Settings” and select the Exif tag you want to set in the list in each item of “ExifTextLayer 1,2,3,4 Settings”.
・If you want to combine any string of characters into one layer, you can enter the characters in “enter custom text” and add them with “add”. You can set the added custom text to the position you want to display.
・You can decide the order of the tags added to the list using “↑” and “↓”. You can also delete it by clicking “✕”.
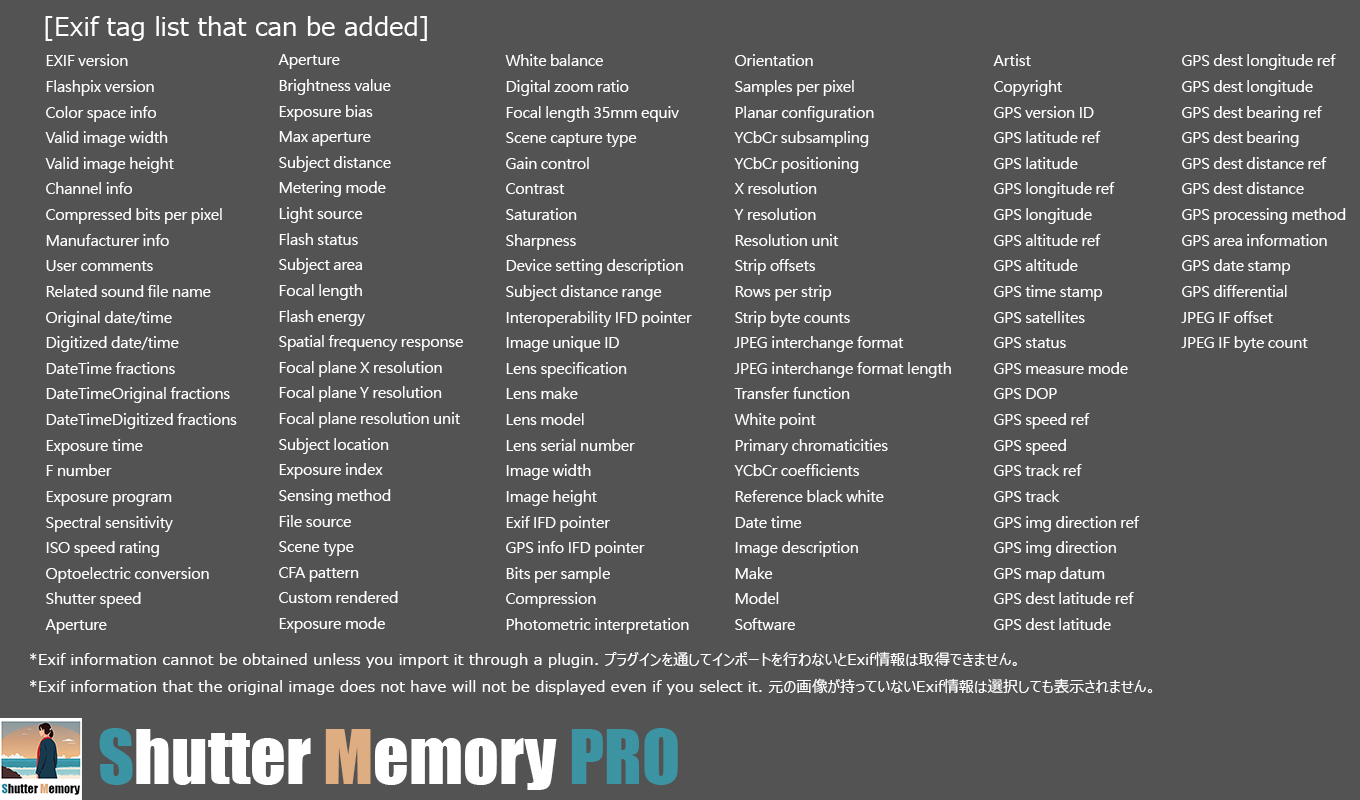
・The default preset is “Exif (Equupment & Settings & Date and Time)”, so if you set it in the preset settings at the top of the plug-in, you can set the commonly used layer 1 “Camera Make, Camera Model” ,Lens Model” layer 2 “Focal Length,F-Number,Exposure Time,ISO Speed Ratings” layer 3 “Date and Time (Original)” and layer4 “©(custom text),Copyright” are set.
1. ExifVersion – Version of Exif specification used to create the metadata.
2. FlashpixVersion – Version of Flashpix format used.
3. ColorSpace – The color space information tag specifies the color space the image was captured in.
4. PixelXDimension – The valid width (in pixels) of the meaningful image data.
5. PixelYDimension – The valid height (in pixels) of the meaningful image data.
6. ComponentsConfiguration – Information about the channels (samples per pixel) in the image data.
7. CompressedBitsPerPixel – The compressed bits per pixel in the image.
8. MakerNote – Manufacturer-specific metadata written by the camera.
9. UserComment – Comments added by the user.
10. RelatedSoundFile – Name of the related audio file.
11. DateTimeOriginal – Date and time when the original image data was generated.
12. DateTimeDigitized – Date and time when the image was stored as digital data.
13. SubsecTime – Fractions of seconds for the DateTime tag.
14. SubsecTimeOriginal – Fractions of seconds for the DateTimeOriginal tag.
15. SubsecTimeDigitized – Fractions of seconds for the DateTimeDigitized tag.
16. ExposureTime – The exposure time of the image in seconds.
17. FNumber – The F-number or aperture value of the lens.
18. ExposureProgram – The exposure program used for the image.
19. SpectralSensitivity – Spectral sensitivity information of the image sensor.
20. ISOSpeedRatings – The ISO speed rating of the camera sensor.
21. OECF – Optoelectronic conversion function used by the image sensor.
22. ShutterSpeedValue – Shutter speed value of the exposure.
23. ApertureValue – The aperture value of the lens when the image was captured.
24. BrightnessValue – The brightness value (EV) of the captured image.
25. ExposureBias – The exposure bias value of the captured image.
26. MaxApertureValue – The smallest F-number of the lens.
27. SubjectDistance – Distance to the subject in meters.
28. MeteringMode – The metering mode used for exposure measurement.
29. LightSource – The kind of light source for the scene.
30. Flash – Indicates whether the flash fired or not.
31. SubjectArea – Location and area of the main subject in the image.
32. FocalLength – Focal length of the lens in millimeters.
33. FlashEnergy – The strobe energy in Beam Candle Power Seconds (BCPS).
34. SpatialFrequencyResponse – Spatial frequency response of the sensor.
35. FocalPlaneXResolution – Number of pixels per FocalPlaneResolutionUnit in the image width.
36. FocalPlaneYResolution – Number of pixels per FocalPlaneResolutionUnit in the image height.
37. FocalPlaneResolutionUnit – Unit for measuring FocalPlaneXResolution and FocalPlaneYResolution.
38. SubjectLocation – Location of the subject in the image.
39. ExposureIndex – Exposure index selected on the camera.
40. SensingMethod – The image sensor type used for capturing the image.
41. FileSource – Image data source (e.g. 3 = DSC).
42. SceneType – Indicates if image was captured directly or imported (1 = directly photographed).
43. CFAPattern – The color filter array geometric pattern of the image sensor.
44. CustomRendered – Custom image processing done by the camera.
45. ExposureMode – Exposure mode set on the camera for the image.
46. WhiteBalance – The white balance mode (1 = auto, 2 = manual).
47. DigitalZoomRatio – Digital zoom ratio used when capturing the image.
48. FocalLengthIn35mmFilm – Equivalent focal length assuming a 35mm film camera.
49. SceneCaptureType – Type of scene that was captured.
50. GainControl – Degree of overall image gain adjustment applied.
51. Contrast – Direction of contrast processing applied by camera.
52. Saturation – Direction of saturation processing applied by camera.
53. Sharpness – Direction of sharpness processing applied by camera.
54. DeviceSettingDescription – Description of processing done by the camera.
55. SubjectDistanceRange – Distance range to the subject.
56. InteroperabilityIFDPointer – Pointer to the Interoperability IFD metadata.
57. ImageUniqueID – Unique identifier assigned to the image.
58. LensSpecification – Specification details about the lens used.
59. LensMake – Manufacturer of the lens used.
60. LensModel – Model of the lens used.
61. LensSerialNumber – Serial number of the lens.
62. ImageWidth – Width of the full image in pixels.
63. ImageHeight – Height of the full image in pixels.
64. ExifIFDPointer – Pointer to Exif IFD metadata.
65. GPSInfoIFDPointer – Pointer to GPS Info IFD metadata.
66. BitsPerSample – Number of bits per channel/sample.
67. Compression – The compression scheme used for the image data.
68. PhotometricInterpretation – The pixel composition (e.g. RGB, grayscale).
69. Orientation – The orientation of the image data as it should be rendered.
70. SamplesPerPixel – The number of channels per pixel.
71. PlanarConfiguration – How pixel data is organized (chunky or planar).
72. YCbCrSubSampling – The subsampling ratio of Y to C used in YCbCr data.
73. YCbCrPositioning – The positioning of chrominance components in YCbCr data.
74. XResolution – The X resolution of the image in resolution units.
75. YResolution – The Y resolution of the image in resolution units.
76. ResolutionUnit – The units for XResolution and YResolution.
77. StripOffsets – For stripped images, the offsets to the data strips.
78. RowsPerStrip – Number of rows of pixel data per strip.
79. StripByteCounts – The number of bytes in each data strip.
80. JPEGInterchangeFormat – Offset to the start of JPEG data for JPEG-compressed images.
81. JPEGInterchangeFormatLength – Length of the JPEG data.
82. TransferFunction – Transfer function used by the camera.
83. WhitePoint – The white point chromaticity of the image.
84. PrimaryChromaticities – The chromaticities of the primaries of the image.
85. YCbCrCoefficients – The transformations used to generate YCbCr data.
86. ReferenceBlackWhite – Reference black/white values.
87. DateTime – The date and time of image creation.
88. ImageDescription – Description or comments about the image.
89. Make – Manufacturer of the device used to capture the image.
90. Model – Model name/number of the device used.
91. Software – Software used to create the image.
92. Artist – Person who created the image.
93. Copyright – Copyright information about the image.
94. GPSVersionID – Version of GPSInfoIFD metadata.
95. GPSLatitudeRef – Reference for latitude value (N/S).
96. GPSLatitude – Latitude coordinate.
97. GPSLongitudeRef – Reference for longitude value (E/W).
98. GPSLongitude – Longitude coordinate.
99. GPSAltitudeRef – Reference for altitude value (above/below sea level).
100. GPSAltitude – Altitude in meters.
101. GPSTimeStamp – Time stamp from GPS receiver when coordinate was recorded.
102. GPSSatellites – Satellite information for reading GPS data.
103. GPSStatus – Status of GPS receiver when coordinate was recorded.
104. GPSMeasureMode – Mode of GPS measurement used.
105. GPSDOP – GPS data degree of precision.
106. GPSSpeedRef – Reference for speed value (km/h, knots etc).
107. GPSSpeed – Speed of travel from GPS receiver.
108. GPSTrackRef – Reference for tracking direction value.
109. GPSTrack – Direction of travel from GPS receiver.
110. GPSImgDirectionRef – Reference for image direction value.
111. GPSImgDirection – Direction of image when captured.
112. GPSMapDatum – Geodetic survey data used by GPS receiver.
113. GPSDestLatitudeRef – Reference for destination latitude value.
114. GPSDestLatitude – Destination latitude coordinate from GPS receiver.
115. GPSDestLongitudeRef – Reference for destination longitude value.
116. GPSDestLongitude – Destination longitude coordinate from GPS receiver.
117. GPSDestBearingRef – Reference for bearing to destination value.
118. GPSDestBearing – Bearing to destination from GPS receiver.
119. GPSDestDistanceRef – Reference for distance to destination value.
120. GPSDestDistance – Distance to destination from GPS receiver.
121. GPSProcessingMethod – Methods used for processing GPS data.
122. GPSAreaInformation – Name of GPS area.
123. GPSDateStamp – GPS date stamp.
124. GPSDifferential – Indicates if differential GPS data is present.
125. JpegIFOffset – Offset to JPEG data in IFD1 metadata.
126. JpegIFByteCount – Length of JPEG data in IFD1 metadata.
The number of tags that can be handled in v1.0.2 has been updated to 126.
Step 2
Create a text layer design
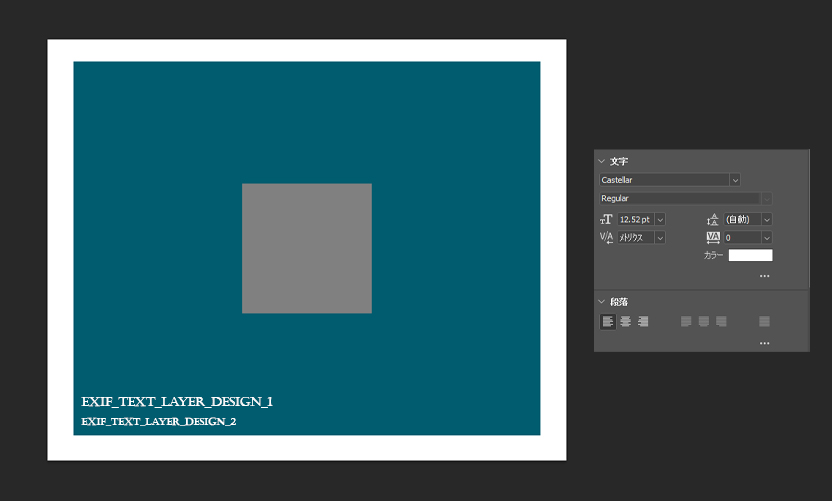
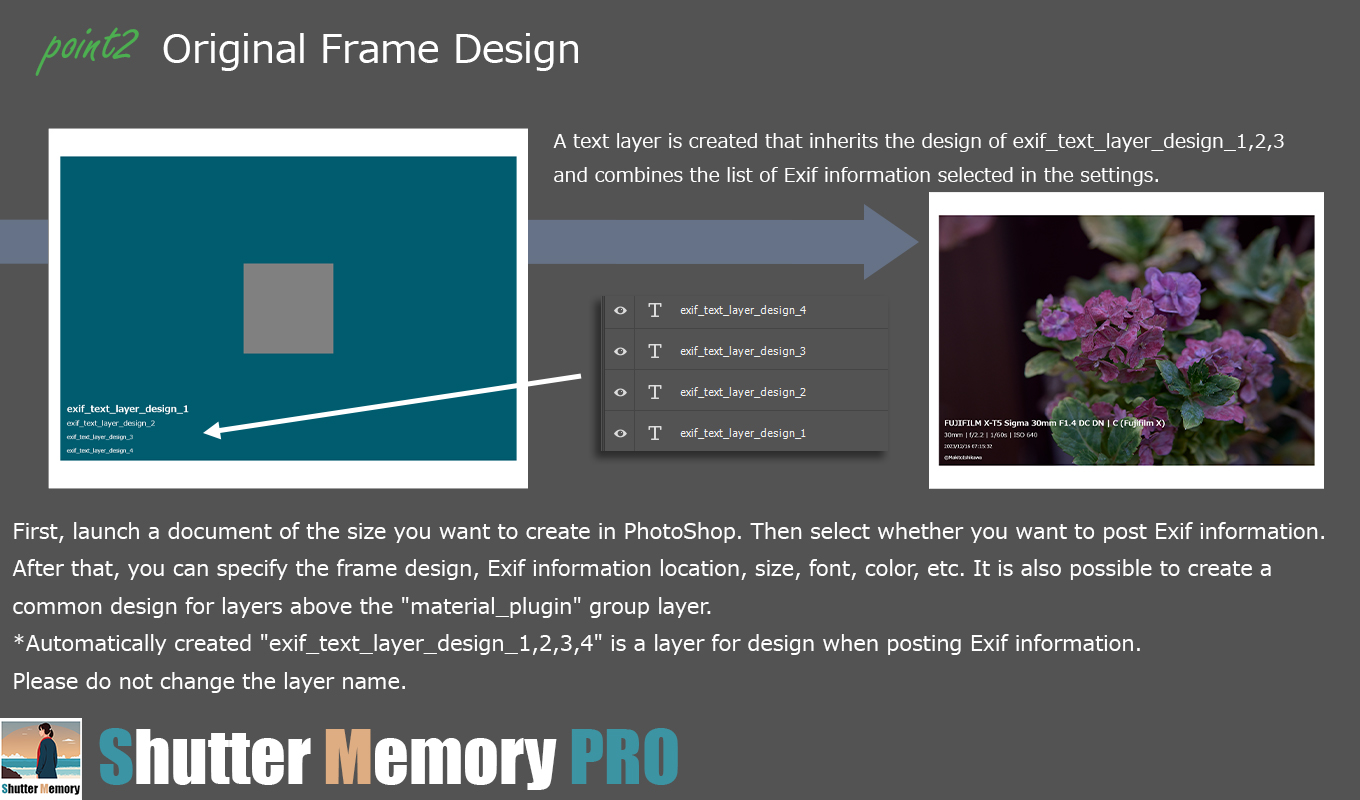
・If “Add Exif information” is checked and a list of Exif tags is added, the design text layer corresponding to the added list will be displayed. If the list is empty, it will be hidden. *If “material_plugin” contains images, they will all be hidden, so please display them manually and use them in your design.
・Please feel free to design the text layer for your design using the functions of PhotoShop. Please do not change the state of the text layer such as “rasterize” or “smart object”. Please create a design that can be used while maintaining the text layer status such as “placement”, “font”, “size”, “indent”, “alignment”, and “layer style”.
*If you have set many Exif tags, please be careful not to exceed the document size depending on the number of characters.
*Please do not change the layer name from “exif_text_layer_design_1”, “exif_text_layer_design_2”, “exif_text_layer_design_3”, and “exif_text_layer_design_4”.
*If you delete the design text layer, restart the plug-in or uncheck “Add Exif information” and then check it again to create it.
Step 3
Import & Export Images
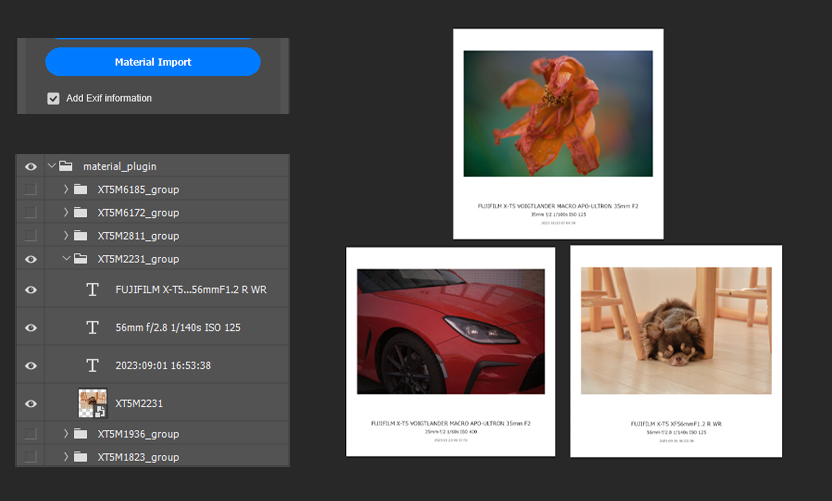
・Check “Add Exif information”, click “Import material”, and select the image you want to add. (Multiple selections possible)
・A text layer will be created with the selected image and the Exif information you set the list for, combined into a group layer and added to the “material_plugin” group layer.
・You can display the child layers of “material_plugin” one by one using the <,◎,> buttons of “Preview Controller”.
・Once the final design is complete, select the format, click “Export All Images” and select the export folder, and all images will be automatically exported.
Other
Preset function
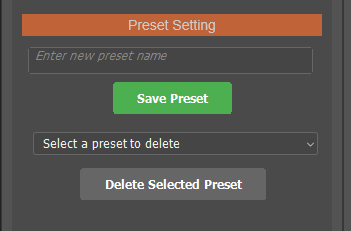
・Two types of presets are saved by default. “Simple Frame” “Exif(Equpment & Settings & Date and Time)”
・Items that can be saved in a preset are “Add Exif information check status”, “image scale”, “image position”, and “design layer list”.
・By saving the designed Photoshop document on your PC and combining it with presets, you can continuously create the same frame design.
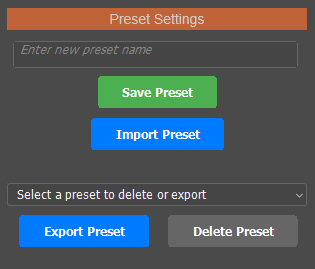
Coming soon v1.0.3:
Added preset export and import functions.
You can share your presets with other devices or third parties.
By sharing PhotoShop document data and Shuttre Memory presets, other devices or third parties can create the same design.
Reference designs & templates
To create a reference design, download the template, open a PhotoShop document from the template, and set the following settings according to the aspect ratio.It is convenient to register frequently used plug-in settings as a plug-in preset.

Exif tag settings
Camera Make
Camera Model
Lens Model
Focal Length
F-Number
Exposure Time
ISO Speed Ratings
Date and Time(Original)
Size Position Setting
Exif tag settings
Camera Make
Camera Model
Lens Model
Focal Length
F-Number
Exposure Time
ISO Speed Ratings
Size Position Setting
Scale(%):95%
Notes
- Correct operations cannot be performed within the artboard.
- Do not perform any other work while the plug-in is processing, such as during import or export.
- If you want to move the document and work on it, press the restart button at the bottom of the plugin.
- If you trim the document size using the cropping tool while the plugin settings screen is open, a bug will occur in the settings. Be sure to press the reset button after changing the document size.
Q&A
Is Exif information recorded in the added image? After processing captured images with development software, if metadata is not recorded in the export settings, Exif information may not remain in the developed photos.
Cannot be purchased outside of Adobe Marketplace. In order to accurately manage updates, etc., we only sell on the Adobe Marketplace.
For images with different aspect ratios, we recommend setting the canvas size of the PhotoShop document that matches each aspect ratio.
ShutterMemory Pro
Plugin for Photoshop | Current Version 1.0.2
(ADOBE Creative Cloud Market Place)